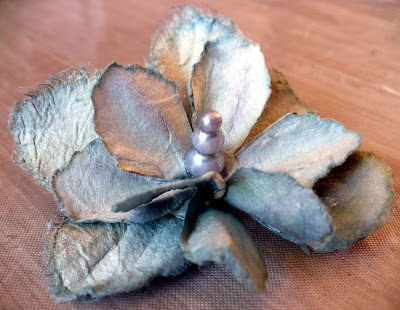
Let's Perfect Pearl Purple Posies!! :)
Like this! A different angle, a different look!
Wednesday, December 30, 2009
Friday, December 25, 2009
Merry CHristmas!
Just wanted to wish you a very Merry Christmas along with my two little elves!
All our best!
~A
Friday, December 18, 2009
Happy Anniversary!
Tuesday, December 15, 2009
A Red and Cream Rolled Wreath!
Want to see my red and cream rolled wreath?
Sounds like a tongue twister, right?
I fell in love with these Jenni Bowlin papers and knew that I was going to make Christian this wreath with them. No reason, really. Just wanted to make it. Helped that the lyrics on one of the papers are also in German! It's a love song he tells me! :)
Here's his wreath.
And here is a close-up on the formation of the wreath. I did have to go an bling it with some ultrafine German glass glitter. Had to. It was begging me to!
So that is my red and cream rolled wreath! Let me know if you would like any info on it. I'd be more than happy to share! :) Drop me a line and time.
~A
Monday, December 14, 2009
A few of my newer "Me" LOs..
Saturday, December 12, 2009
Winter Card Mock-up
A dear person in my life asked me the other day to help her come up with an idea for some "Wintery" cards to send this season as she was in a creative rut. I must say that I was and am rather honored by this as she is a graphic designer. Anyway, after a few messages back and forth and this card was what was created..
After some consideration, the pearl on the sheer ribbon bow has been replaced by a silver star. The opal shimmer white border bottom will most likely be personalized in the end with a stamp or monogram.
I'm please with this card and had a great time helping Wasa out with everything this year! I'd do it again in a heart beat! Love you! :)
~A
Friday, December 4, 2009
My vintage inspired altered Trinket Box project.
I was inspired the other day to create an altered trinket box out of a wooden box and vintage sheet music that I have been looking at forever and ever. I also have had the Making Memories Vintage pattern paper stack that I've been trying to figure out what to do with. Gavin and I looked at every thing and decided to just go for it and see what we could come out with.
We painted the inside and bottom of the box black so there was a basic neutral to work from. Then we decided upon the patterned paper to cover the box with. Glued that down with some PVA. Distressed the paper with some Distress Ink.
The vintage sheet music was distressed with guess what, more Distress Ink! Haha! Then we carefully punched it with Martha's trusty Double Loop Border Punch. Love that Punch! Glued them down gently with some more PVA.
While the PVA was drying we tackled the chipboard flourish with Distress Ink and coordinating Distress Stickles in two colors. After all of the PVA dried on the box and the Stickles were also dry it was time to take out my trusty Zip Dry. The flourish was glued down where Gavin wanted it, nice placement if I do say so, and then it was time to play with Primas!
Here is the Prima that we created from two flat natural colored mulberry Primas, Distress Ink, Sage Glimmer Mist, and the head of a Maya Road Trinket Pin. The flourish and about the flower gained mocha pearls here and there to finish it off.
We are quite pleased with how our Trinket Box came about. Now to figure out what to do with it! Perhaps a Christmas present for someone, keep it, or something else. Right now we are enjoying looking at it.
The Trinket Box is shown here in many views in the following pictures. Gavin was my helper in picking out what to show you and thought that you needed several. :)
Wednesday, December 2, 2009
A Sassy Lassy
So my Elizabeth is quite the "Sassy Lassy" these days. She's become your typical three year old and then some. I'm being given quite the run for my money with her! A few weeks ago she was hamming it up for me and I snapped a few pictures. I sat down yesterday with her and created this layout using the November girl kit from Scrap for a Cure. Love this Kit!!
I had better go. Miss Elizabeth is into something... Again....
Have a great day!
~A
Here is a close up of the 3D transparent butterfly embellishment area. I used my heat tool to soften them up and them scrunched them. It was hot to do, but fun! Quite textural too.
I had better go. Miss Elizabeth is into something... Again....
Have a great day!
~A
Monday, November 30, 2009
It is December Kit time at Scraptacular! Projects and Kit pics! :)
Happy December Kit time from SCRAPTACULAR!!!! YAY! :)
Check out this fabulous kit for December from Scraptacular! Beth has outdone herself!
This month’s kit includes:
~(1) sheet Webster’s Pages Wish Upon a Star
~(1) sheet Webster’s Pages December Journal
~(1) sheet Webster’s Pages Oh Christmas Tree
~(1) sheet Webster’s Pages Christmas Sky
~(1) sheet Webster’s Pages Mistletoe Kisses
~(1) sheet Webster’s PagesSanta’s Village
~(1) sheet Crate Paper Lights
~(1) sheet Crate Pine
~(1) sheet Crate Scarf
~(1) sheet Crate Trimmings
~(1) sheet Making Memories Flocked Snowflake
~(1) Jillibean Soup Pinch Christmas Cheer
~(1) Jillibean Soup Frozen Crab Meat
~(1) Jillibean Soup Can Beef Consomme
~Websters Pages Home for Holidays Letters
~(1) Prima Swan Lake Flower
~(2) Making Memories Mistletoe Journal Cards
~(2) Ft coordinating ribbon
~(1) Making Memories Clear Glitter accent
~Making Memories Mistletoe flowers
~(1) Glitter Star
~Zva Creative Crystal Corner Flourishes
~Little Yellow Bicycle Die Cut Border
~(2) Elle’s Studio Holiday Tags
~Elle’s Studio Vintage Calendar Tags
~Crate paper North Pole journal stickers -OR- Word Stickers (Our Choice)
Here are the layouts and projects I had such fun creating with this kit. Be sure to snatch your kit up ASAP as I am sure they will not last long!
Check out this fabulous kit for December from Scraptacular! Beth has outdone herself!
This month’s kit includes:
~(1) sheet Webster’s Pages Wish Upon a Star
~(1) sheet Webster’s Pages December Journal
~(1) sheet Webster’s Pages Oh Christmas Tree
~(1) sheet Webster’s Pages Christmas Sky
~(1) sheet Webster’s Pages Mistletoe Kisses
~(1) sheet Webster’s PagesSanta’s Village
~(1) sheet Crate Paper Lights
~(1) sheet Crate Pine
~(1) sheet Crate Scarf
~(1) sheet Crate Trimmings
~(1) sheet Making Memories Flocked Snowflake
~(1) Jillibean Soup Pinch Christmas Cheer
~(1) Jillibean Soup Frozen Crab Meat
~(1) Jillibean Soup Can Beef Consomme
~Websters Pages Home for Holidays Letters
~(1) Prima Swan Lake Flower
~(2) Making Memories Mistletoe Journal Cards
~(2) Ft coordinating ribbon
~(1) Making Memories Clear Glitter accent
~Making Memories Mistletoe flowers
~(1) Glitter Star
~Zva Creative Crystal Corner Flourishes
~Little Yellow Bicycle Die Cut Border
~(2) Elle’s Studio Holiday Tags
~Elle’s Studio Vintage Calendar Tags
~Crate paper North Pole journal stickers -OR- Word Stickers (Our Choice)
Saturday, November 14, 2009
Quick and Cute Ornaments to Make
This weekend holds the last two days of the Fall Fest Online Crop at Scraptacular! For the crop, I have put together this Make & Take for everyone to try out. If you are looking for a FUN batch of Challenges, Games, and Make &Takes....not to mention PRIZES!!!... come on over to Scraptacular for the weekend and play along!!
~~~~
Here is a quick and easy ornament to make out of your scraps, odds and ends, or random leftover papers. They're Pretty cute too!
We are going to be making these!
You will need: Scraps of PP, a trimmer, good adhesive, and a ribbon.
Cut the PP into two each of the following lengths x 1/2″: 2″, 3″, 4″, 5 1/2″, and 7″.
Adhere the two 2″ pieces together to make a strong and stable center post.
Adhere ends of 3″ strip to 2″ strip. It makes a nice arch.
~~~~
Here is a quick and easy ornament to make out of your scraps, odds and ends, or random leftover papers. They're Pretty cute too!
We are going to be making these!
You will need: Scraps of PP, a trimmer, good adhesive, and a ribbon.
Cut the PP into two each of the following lengths x 1/2″: 2″, 3″, 4″, 5 1/2″, and 7″.
Adhere the two 2″ pieces together to make a strong and stable center post.
Adhere ends of 3″ strip to 2″ strip. It makes a nice arch.
Repeat on other side of 2″ strip.
Continue in this fashion for the remaining strips going up in size accordingly.
Now all the strips are used and it is time for shaping the ornament, if desired, and the ribbon.
If you do not wish to shape your ornament further than it already is, skip ahead to the ribbon part.
If you want to “fluff and puff” your ornament, pinch one end and gently bend the sides equally to desired shape.
Friday, November 13, 2009
Wednesday, November 4, 2009
Autumn Bliss Crop is This Weekend at Scrap for a Cure!!!
Ready for another awesome online crop at Scrap For A Cure!?
This Friday, Saturday, and Sunday!!! November 6, 7, 8.
The crop will begin on Friday evening and go through Sunday. We will have challenges and games posted all weekend long!!! If you've never cropped with us here, you are in for a fun weekend!! We have tons of prizes to give away, lots of fun, and lots of laughs!!!
Hope to see you there!!
~A
Tuesday, November 3, 2009
Fall Fest Crop week is coming to Scraptacular!!!
Fall Fest Online Crop!
Join us at Scraptacular for some fun at our Fall Fest Online Crop November 9th-15th. There will be lots of games, challenges, make n takes and prizes! This will be a weeklong celebration starting Monday morning and running until Sunday at midnight EST. Check out our forum for more information and to get the scoop on a contest we are running right now!
~A
November's Kit at Scraptacular!!! My DT work too!!
Hello!!!
November's kit at Scraptacular is FABULOUS!!!! Here's a pic!
The November Scraptacular Kit contains:
~ (1) sheet Cosmo Cricket Nutmeg Elements~ (1) sheet Cosmo Cricket Acorn~ (1) sheet Cosmo Cricket Maple ~ (1) sheet Cosmo Cricket Autumn~ (1) sheet Cosmo Cricket Clove ~ (1) sheet Cosmo Cricket Falling Down~ (1) sheet Cosmo Cricket Cinnamon ~ (1) sheet Cosmo Cricket Nutmeg Borders~ (1) sheet Dream Street Change is Good ~ (1) sheet Dream Street Seasons of Change~ (1) sheet Dream Street Hoot Hoot ~ (1) sheet Jillibean Soup Hint of Gossip~ (1) sheet Bazzill Swiss Dot Scallop ~ (3) sheets Bazzill Cardstock~(1) Jillibean Soup Kraft Card & Envelope ~(2) pieces Maya Road Pom Pom Trim~(2) Maya Road Velvet Blossoms ~(6) button flowers from Evalicious~(2) Making Memories Copper Butterflies ~assorted Cosmo Cricket chip shapes~(10) Maya Road Chip Leaves ~(2) Little Yellow Bicycle Fabric Tags~Dream Street Sam Alphas ~(6) Little Yellow Bicycle Clear Cuts~(1) Autumn Bird Tag from Cocoa Studio ~(1) LYB Autumn Bliss Mat
A TON of stuff for $21.99!
Here are some of my Design Team work using this great kit!
Thanks for looking! If you are enjoying the kit, run over to Scraptacular today to get one! They are almost gone!!!
~A
Subscribe to:
Posts (Atom)